TL;DR
A closet can work as a recording booth if you focus on reducing reflections and sound leaks, not just adding foam. Proper placement, treatment, and ventilation make a huge difference. Covering key reflection points and sealing gaps are top priorities.
Ever tried recording in a tiny closet? It’s a mixed bag. On one hand, it’s a cheap, quick way to get decent sound. On the other, tiny spaces tend to echo and leak noise like crazy. But here’s the truth: the biggest improvements come from smart placement and targeted treatment, not just slapping foam everywhere.
If you want quiet, clear recordings without blowing your budget on fancy panels, this guide is your best friend. We’re talking about how to turn a cramped closet into a usable, effective vocal booth—or at least a space that sounds a lot better and isn’t a noise nuisance.
Acoustic dampening
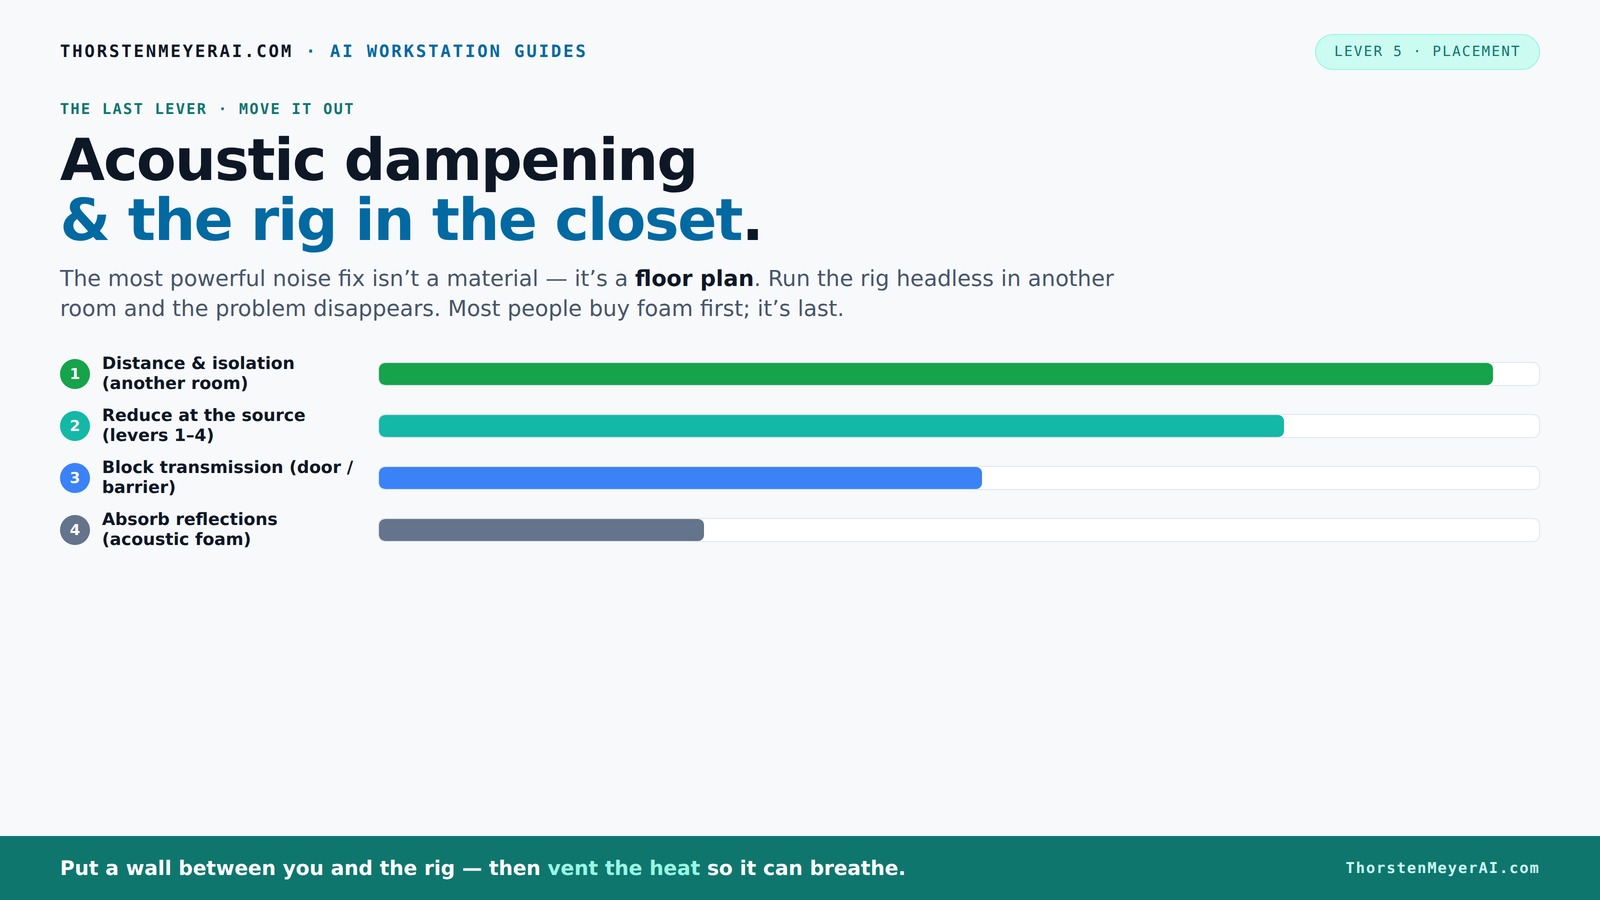
& the rig in the closet.
The most powerful noise fix isn’t a material — it’s a floor plan. A rig you can’t hear because it’s in another room beats any amount of foam. Tap the approaches in Part 1 to see what actually works.
(another room)
(levers 1–4)
(door / barrier)
(acoustic foam)
Contain the noise, not the heat
Key Takeaways
- Prioritize reducing reflections and leaks over adding foam; sealing gaps can cut noise transmission by up to 80%.
- Place treatment at reflection points—behind the mic, ceiling, and side walls—for maximum effectiveness.
- A closet can work well for recording if it’s treated properly, sealed, and ventilated.
- Ventilation is critical—use quiet fans and ducting to prevent overheating and noise buildup.
- Don’t overthink it: covering 70-80% of surfaces with foam or blankets is enough to tame echo and leaks.

Focusound 52 Pack Acoustic Foam Panels 1" x 12" x 12" Sound Proof Foam Panles Soundproofing Noise Cancelling Wedge Panels for Home Office Recoding Studio with 300PCS Double-Side Adhesive
Soundproofing - Acoustic foam panels triangular grooves structure for better noise absorption, helps to reduce and absorb unwanted...
As an affiliate, we earn on qualifying purchases.
As an affiliate, we earn on qualifying purchases.
Why a closet can actually be a secret weapon for sound control
Most people think bigger is better when it comes to soundproofing. Not so here. A small closet naturally limits sound reflections because of its tight walls. It’s like a tiny cave that keeps echoes contained. But it’s not perfect—cramped, reflective, and leaky spaces need a plan.
Imagine recording vocals in a closet lined with blankets, with a mic pointed at a foam-covered wall. The result? Less echo, fewer leaks, and a more controlled sound. A closet isn’t just a makeshift booth; it’s a strategic space that, with some tweaks, can be surprisingly effective.

8 Pack - Bass Traps Acoustic Foam Corner, 8''x8''x12'' Black Bass Traps Corner Studio Foam, High Density and Fire-Proof Acoustic Panels Recording Studio Acoustical Treatments
Acoustic Principle- Bass Trap is a kind of sound absorbing structure specially used to absorb specific low-frequency standing...
As an affiliate, we earn on qualifying purchases.
As an affiliate, we earn on qualifying purchases.
The real difference: dampening sound reflections vs. soundproofing leaks
Acoustic dampening and soundproofing aren’t the same. Acoustic dampening softens echoes and reduces reverb inside the space, while soundproofing blocks sound from escaping or entering. For a closet rig, dampening is your first target.
Think of it like this: foam panels and blankets absorb sound waves bouncing around, making the space less boxy. But they won’t stop noise from leaking through gaps or cracks. For that, sealing the door and filling gaps is essential.
Key tip: focus on the reflection points—walls behind the microphone, ceiling, and even the desk surface. Cover these with thick blankets or foam to tame the sound bouncing back at you.
Understanding this distinction matters because it influences your approach. If your goal is to prevent sound from disturbing others outside, then soundproofing is necessary. But if you want to improve the clarity of your recordings by controlling internal reflections, dampening and absorption are the priority. The tradeoff? Soundproofing is often more complex and costly, whereas dampening can be achieved with simple DIY materials, making it more accessible for small setups.

Audimute Soundproofing Acoustic Door Seal Kit - Door Sweep and Seal - (Standard Size)
Includes a Door Seal (3/16" x 1/2" x 25') and a Door Sweep (1/2" x 1.5" x 4').
As an affiliate, we earn on qualifying purchases.
As an affiliate, we earn on qualifying purchases.
Where to place your treatment for maximum bang for your buck
Placement matters more than you think. Start with the reflection points—behind your microphone, the ceiling directly above, and the side walls. In a small closet, these spots are the biggest sound bounce zones. Learn more about placement. Start with the reflection points—behind your microphone, the ceiling directly above, and the side walls. In a small closet, these spots are the biggest sound bounce zones.
Imagine a tiny booth: the mic’s reflection point is about 6 inches behind it—treat that area with foam or blankets. Add rugs on the floor to absorb reflections from the hard surface. Hang blankets with an air gap in front of the door to cut leaks and echoes.
Pro tip: treat the surfaces that directly reflect sound back into your mic. For example, a blanket hung a few inches off the wall creates a buffer that reduces echo and leakage at once. This strategic placement ensures you're not wasting effort covering every inch but focusing on the areas that truly impact sound quality. The tradeoff is that over-treating can make the space feel cluttered or reduce natural sound, so aim for a balance that improves clarity without sacrificing comfort or accessibility.

VEVOR Portable Vocal Booth, 6.56 ft Height, Portable Recording Studio with Travel Bag, Mobile Tablet Stand, Thickened Soundproofing, Sound Isolation Booth for Echo-Free Vocals, Podcasts, Voiceovers
Say Goodbye to Echoes: Built with durable Oxford cloth and acoustic padding, this recording booth for the home...
As an affiliate, we earn on qualifying purchases.
As an affiliate, we earn on qualifying purchases.
How much treatment is enough? The rule of coverage and depth
More coverage generally equals better sound. Covering about 70-80% of the reflective surfaces in your closet makes a noticeable difference. Find out how to treat your space. Covering about 70-80% of the reflective surfaces in your closet makes a noticeable difference. Smaller panels (2 inches thick) work well in tight spaces; larger areas benefit from thicker, 4-inch panels or bass traps in corners.
For example, lining the ceiling and walls with foam or blankets can cut echo significantly. If you notice low-end buildup or boomy sound, adding bass traps in the corners is smart. Don’t forget the door—adding a blanket or foam layer can reduce leaks and reflections.
Remember: treatment should be proportional to the space. Cramped closets need more coverage than larger rooms to prevent that “boxy” sound. The tradeoff here is between the level of sound control you want and the amount of space or aesthetic you’re willing to sacrifice. Over-treating can sometimes deaden the room too much, making recordings sound unnatural, so aim for a practical balance.
Sealing gaps and controlling noise leaks through the door and cracks can be crucial. Use weatherstripping or acoustic sealant around the door frame to block leaks. See sealing tips here.
Sound sneaks out through gaps, cracks, and open doors. Sealing these is often more effective than adding foam. Use weatherstripping or acoustic sealant around the door frame to block leaks. A blanket or towel hung over the door with an air gap can dramatically reduce noise escape.
In a tiny closet, even a small crack can leak enough sound to ruin your recordings. Double-check every gap—around vents, light switches, and where the door meets the frame—and seal accordingly. The reason sealing is so critical is because sound leaks can undermine all your other efforts by allowing noise to escape or enter unnoticed. The tradeoff? Over-sealing can make the space feel claustrophobic or reduce ventilation, so balance effectiveness with comfort and airflow needs.
Tip: Consider using a draft stopper or a door sweep to prevent sound from passing underneath. The less sound leaks out, the cleaner your recordings will sound.
Ventilation tricks: keeping it cool without making noise worse
Ventilation is the Achilles’ heel of closet setups. Proper airflow is essential—consider using quiet ventilation solutions to keep your space cool without noise. A sealed closet traps heat, risking overheating and throttling your hardware. The best fix? Active ventilation—quiet exhaust fans or ducted airflow that moves hot air out without rattling or noise.
For example, a small, quiet computer fan pulling air from the closet and venting outside keeps temperatures in check. When choosing fans, look for models specifically designed for quiet operation—some are under 20 dB, barely audible.
Pro tip: ducting can help direct heat away efficiently, and thermostatic controls ensure fans only run when needed, maintaining a cool, silent space. Proper ventilation not only prevents overheating but also ensures fresh air circulation, which is essential during long recording sessions. The tradeoff? Installing ducting and fans adds complexity and cost, but neglecting ventilation risks hardware failure and uncomfortable conditions.
Combining DIY solutions for a quiet, cool closet booth
Want to get serious? Mix blankets, foam, and door seals with a small, quiet exhaust fan. DIY acoustic panels made from recycled materials or thick blankets are surprisingly effective. Cover the walls, ceiling, and door for a full, absorbing environment.
For example, hang a thick blanket with an air gap over the door and line the back wall with foam panels. Add a small fan venting outside, and you have a makeshift but effective vocal booth. Combining these methods maximizes sound absorption and noise control while maintaining good airflow.
Remember: more coverage and sealing lead to better sound control, but always keep ventilation in mind. Balance is key to avoid overheating or creating stagnant air, which can deteriorate sound quality or hardware performance.
Frequently Asked Questions
Can a closet really work as a vocal booth or recording rig?
Yes. If you treat the reflection points, seal gaps, and manage ventilation, a closet can be an effective, budget-friendly vocal booth or recording space. It’s all about controlling echo and leaks, not making it perfectly soundproof.What is the difference between acoustic dampening, absorption, and soundproofing?
Acoustic dampening reduces echo inside the space, absorption absorbs sound waves to prevent bouncing, and soundproofing blocks sound from leaking in or out. For a closet, focus on dampening and absorption first, then seal gaps for soundproofing.Where should I place foam, blankets, or panels in a closet booth?
Start with reflection points—behind the mic, ceiling, and side walls. Also treat the door and floor with blankets or rugs. Cover as much surface area as possible for best results without cluttering the space.Do I need to treat the corners first?
Corners tend to trap low frequencies and cause boomy sound. Bass traps or extra thick panels in corners help control these issues, especially if you notice a muddy low-end in recordings. Prioritizing corners can prevent low-frequency buildup that makes recordings sound muffled or boomy, which is often hard to correct later.How much treatment is enough?
Coverage of 70-80% of reflective surfaces is usually enough to significantly reduce echo. For low frequencies, add bass traps in corners. More treatment yields better results, but don’t overdo it—balance coverage with practicality to avoid deadening the room and making it less natural for recording.Conclusion
Your closet can be a surprisingly good recording space if you focus on controlling reflections, sealing leaks, and managing heat. It’s all about smart placement and coverage—less about total soundproofing, more about making the space predictable and less echoey.
Remember, a little effort in sealing gaps and treating reflection points goes a long way. With good ventilation, your closet becomes a quiet, cozy corner for capturing clean, clear audio—no fancy studio required.